How to enable JavaScript in Chrome
This guide will step you through the process of enabling JavaScript in Google Chrome.
-
Click the "Customize and Control" button
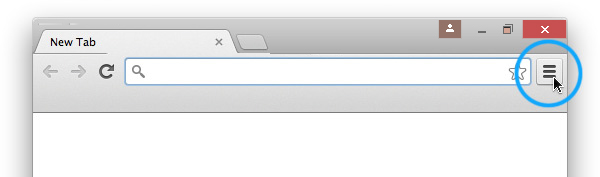
This will reveal a menu with lots of options. One of them will be named "Settings".
-
Select the "Settings" menu item
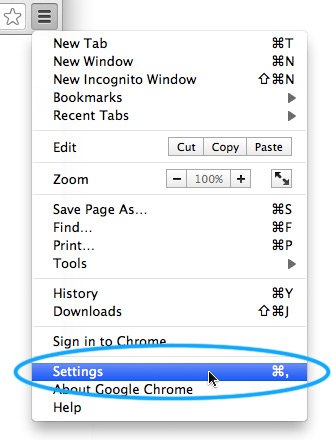
The Settings screen will now appear.
-
Search for the JavaScript settings
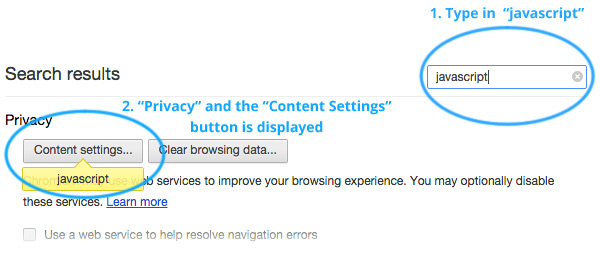
As you type in "JavaScript" (it's not case sensitive) you will see Chrome start to change what's shown on the settings page. It will reveal the "Privacy" section and highlight the "Content settings..." button with the yellow "JavaScript" callout.
Click the "Content settings..." button.
You are then taken directly to the JavaScript setting.
-
Change the JavaScript setting
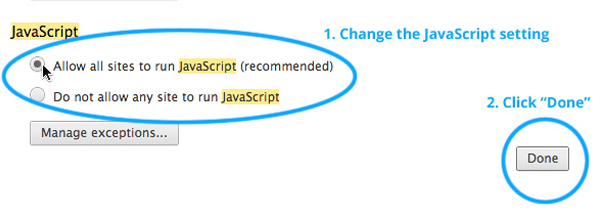
You can now choose "Allow all sites to run JavaScript" to enable/activate JavaScript, or "Do not allow any site to run JavaScript" to disable JavaScript.
If you want to only run JavaScript on certain websites, you can use the "Manage exceptions..." button to control which websites JavaScript will and will not run on.
Once you have made your setting (either enabled JavaScript or disabled it), click the "Done" button to confirm your choice.
You will then be returned to the main Settings page tab. You can now close this tab and resume your normal web browsing with your new setting.
-
JavaScript is now enabled
Congratulations !
How to enable JavaScript in Internet Explorer
This guide will step you through the process of enabling JavaScript in Internet Explorer.
-
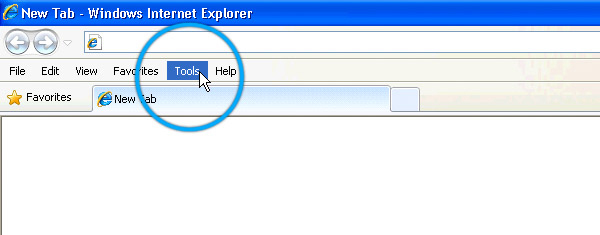
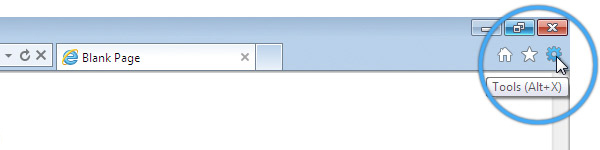
Select the "Tools" menu
In Internet Explorer 6, 7 or 8, "Tools" is a menu at the top of the screen:
In Internet Explorer 9 and higher, "Tools" is found by clicking the gear icon on the right-hand side of the browser window:
-
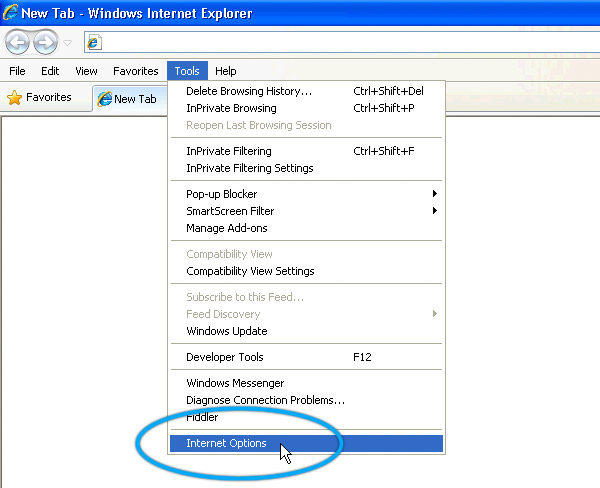
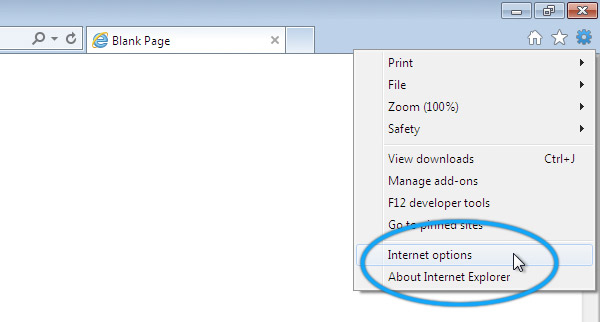
Select "Internet Options"
In Internet Explorer 6, 7 or 8, "Internet Options" is the bottom menu item:
In Internet Explorer 9 and higher, "Internet Options" is the second-last option:
-
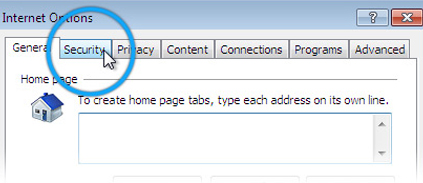
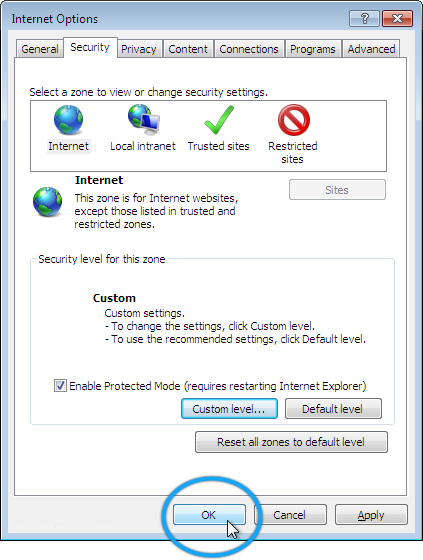
Select the "Security" tab
The window which has just appeared will have a tab labled "Security"; please click it:
-
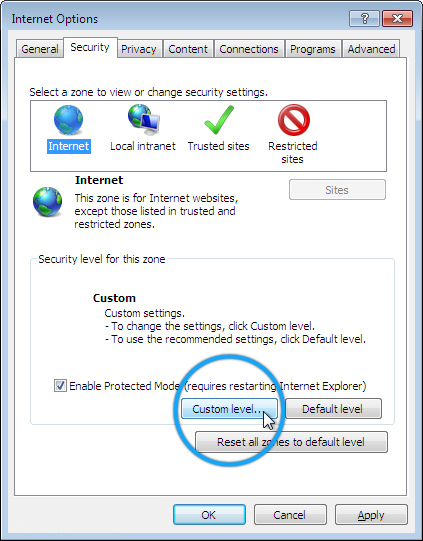
Click the "Custom Level..." button
Enabling or disabling JavaScript in Internet Explorer involves setting a custom security level; so click the button to modify it.
-
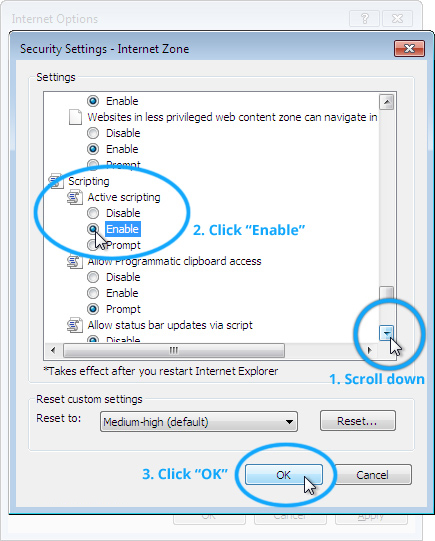
Scroll down and change the Active Scripting setting
Scroll down to the section titled "Scripting". There is a sub-section called "Active scripting". Click the option "Enable" to enable Javascript. Press the "OK" button to save this change.
-
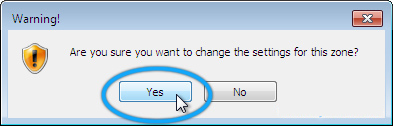
Confirm the change
Because you are changing an important setting, Internet Explorer will prompt you to confirm that you really want to do this. Press the "Yes" button to confirm this change.
-
Close "Internet Options"
You are now returned to the original "Internet Options" window. Press the "OK" button to close it and return to your normal web browsing.
-
JavaScript is now enabled
Congratulations,
Enable JavaScript in Mozilla Firefox
This guide will step you through the process of enabling JavaScript in Firefox.
-
Click into the Address Bar
In newer versions of Firefox (Version 24 and above), some of the more advanced settings have been moved to a different location in Firefox and are no longer accessible from the standard "Settings" controls. You now need to go to a special address to be able to change them.

The Address Bar is at the top of the Firefox window and usually shows the URL of the website you're looking at.
-
Go to the Advanced Configuration url
In the address bar, type in about:config and press enter. You do not need to put in http:// or www or anything like that; simply put about:config and press the Enter key on your keyboard.

-
Accept the warning about changing settings
Because about:config will give you lots of advanced options which can potentially mess up Firefox, you will be warned about not changing anything you're not sure about. Click the "I'll be careful, I promise" button.
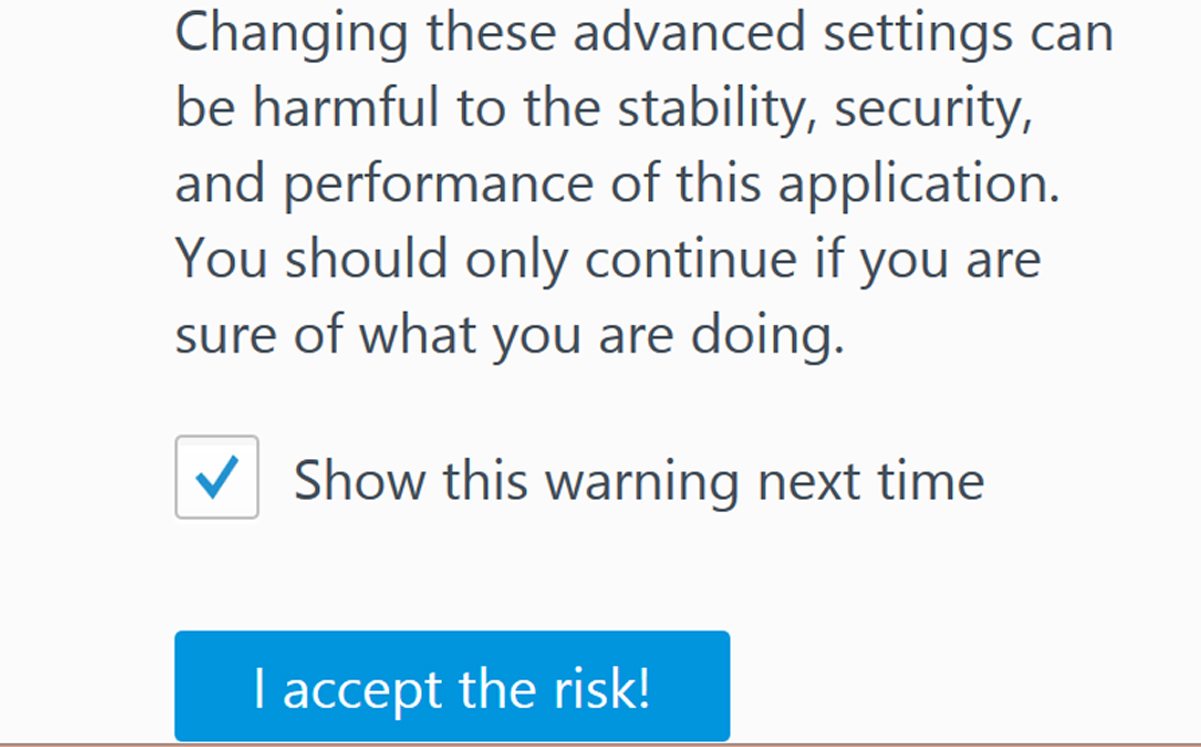
This warning will appear each time you visit about:config unless you untick the "Show this warning next time" button. We recommend keeping this box ticked to remind you each time!
-
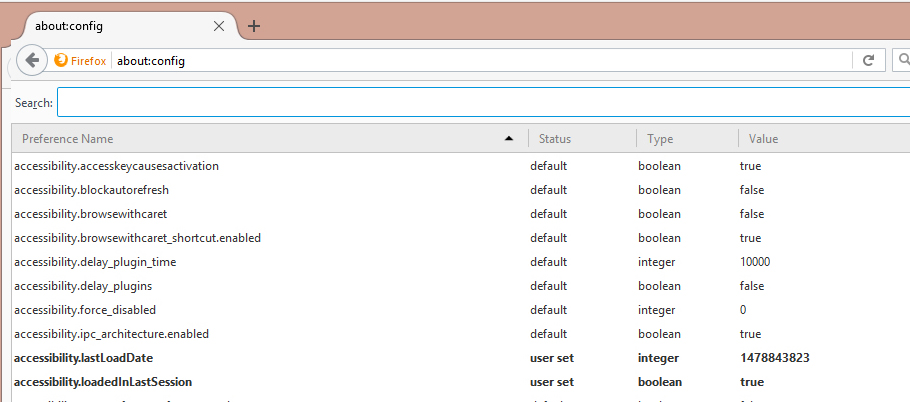
You will now see the list of advanced settings
The list of advanced settings looks like this:
This warning will appear each time you visit about:config unless you untick the "Show this warning next time" button. We recommend keeping this box ticked to remind you each time!
-
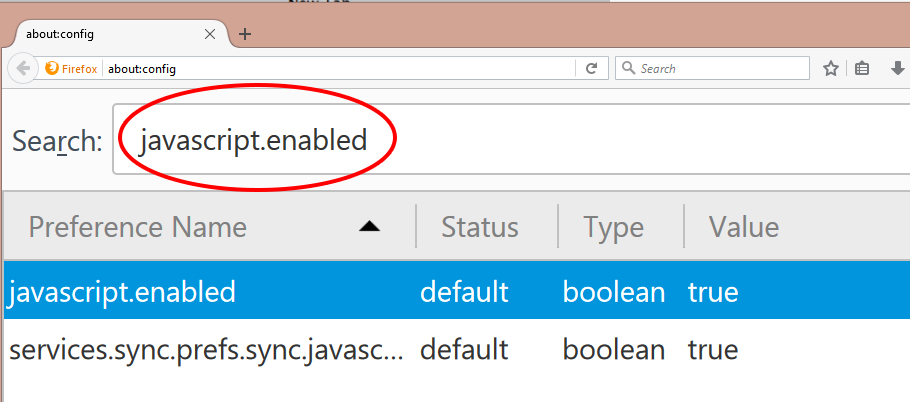
Type "javascript" into the "Search" box at the top to locate the setting you need to change
Because there are so many settings, the easiest way to find the JavaScript setting is to start to type "javascript" into the search box. As you type this, Firefox will reduce the number of settings shown until just the JavaScript based settings appear.
-
Find the "javascript.enabled" preference
One of the settings which you can see should be called "javascript.enabled" in the "Preference Name" column. If you have JavaScript disabled, you should notice that it will be shown in bold text.
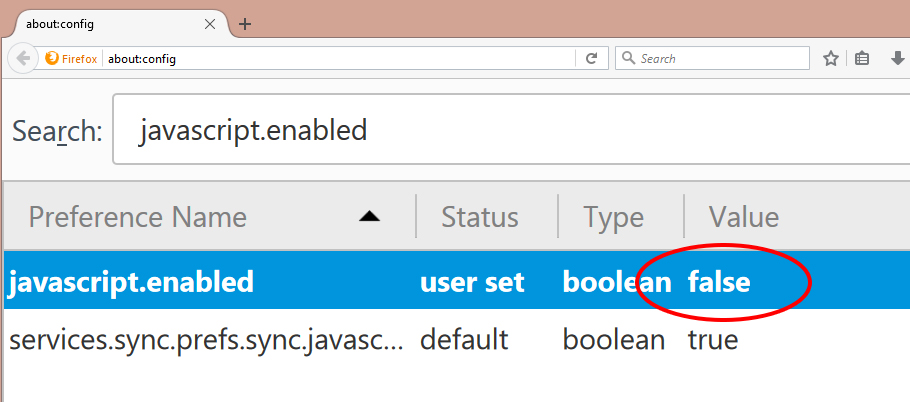
This is because it is not the default setting: the default setting is for "javascript.enabled" to be "true". So that is the setting you need to change.
-
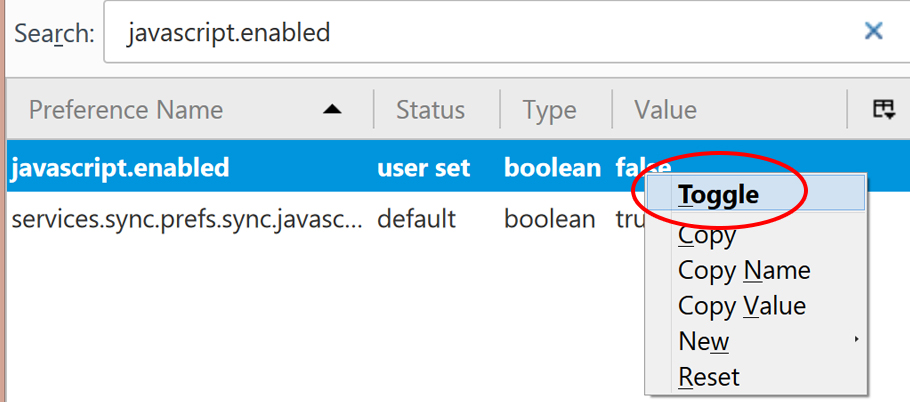
Toggle the false/true preference
On the line for "javascript.enabled", Right Click (or Command Click on Mac) on the "false" value, you will see a small menu appear, the top option is "Toggle". Click "Toggle", and the "false" will change to "true".
Because "true" is the default setting, the entire line will no longer be in bold either.
This is because it is not the default setting: the default setting is for "javascript.enabled" to be "true". So that is the setting you need to change.
-
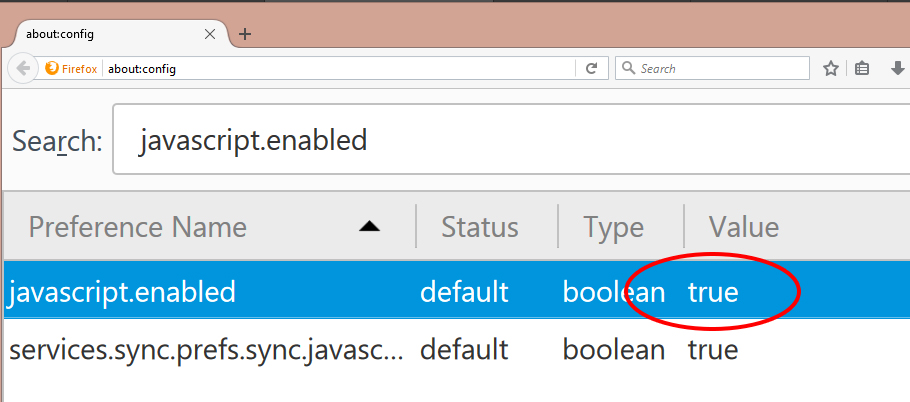
Javascript is now enabled. Close the tab.
Congratulations.
How to enable JavaScript in Opera
This guide will step you through the process of enabling JavaScript in Opera
-
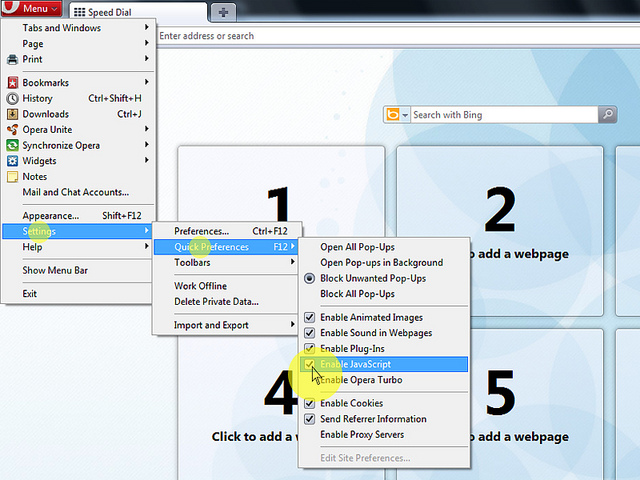
Click on "Menu", hover mouse on the "Settings" then hover mouse on the "Quick preferences" and mark the "Enable Javascript" checkbox.
-
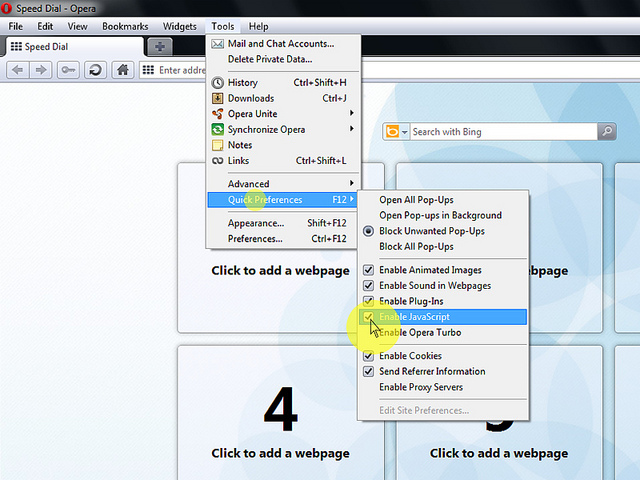
If "Menu bar" is shown click on the "Tools", hover mouse on the "Quick preferences" and mark the "Enable Javascript" checkbox.
-
JavaScript is now enabled
Congratulations !